Pixels
/
4 min read
Set Up Google Ads Conversion Tracking & Enhanced Conversions
Create website conversion actions under Goals in Google Ads, copy Conversion ID and labels, then enter them in Zalify.
If you advertise your Shopify store with Google Ads, you typically need website conversion actions in Google Ads and your Conversion ID plus each event’s Conversion Label in Zalify. That sends e-commerce behavior back to Google Ads for bidding and reporting.
Zalify Pixels already fires and reports standard Google Ads e-commerce events. After installing Zalify, you do not paste Google’s event snippets into your theme—complete the Google Ads steps below and enter the ID and labels in Zalify only:
- View content (often created under the Page view category in Google Ads)
- Add to cart
- Begin checkout
- Purchase
Purchase can use Enhanced Conversions for better matching. UI labels may vary slightly by account language; see Google’s guide: Set up conversions on your website.
Create four e-commerce conversion actions in Google Ads
Repeat the flow four times, choosing Purchase, Page view, Add to cart, and Begin checkout when you pick the category (each maps to one field in Zalify).
1. Open the creation flow
In Google Ads, go to Goals → Conversions → Summary, then click + Create conversion action.
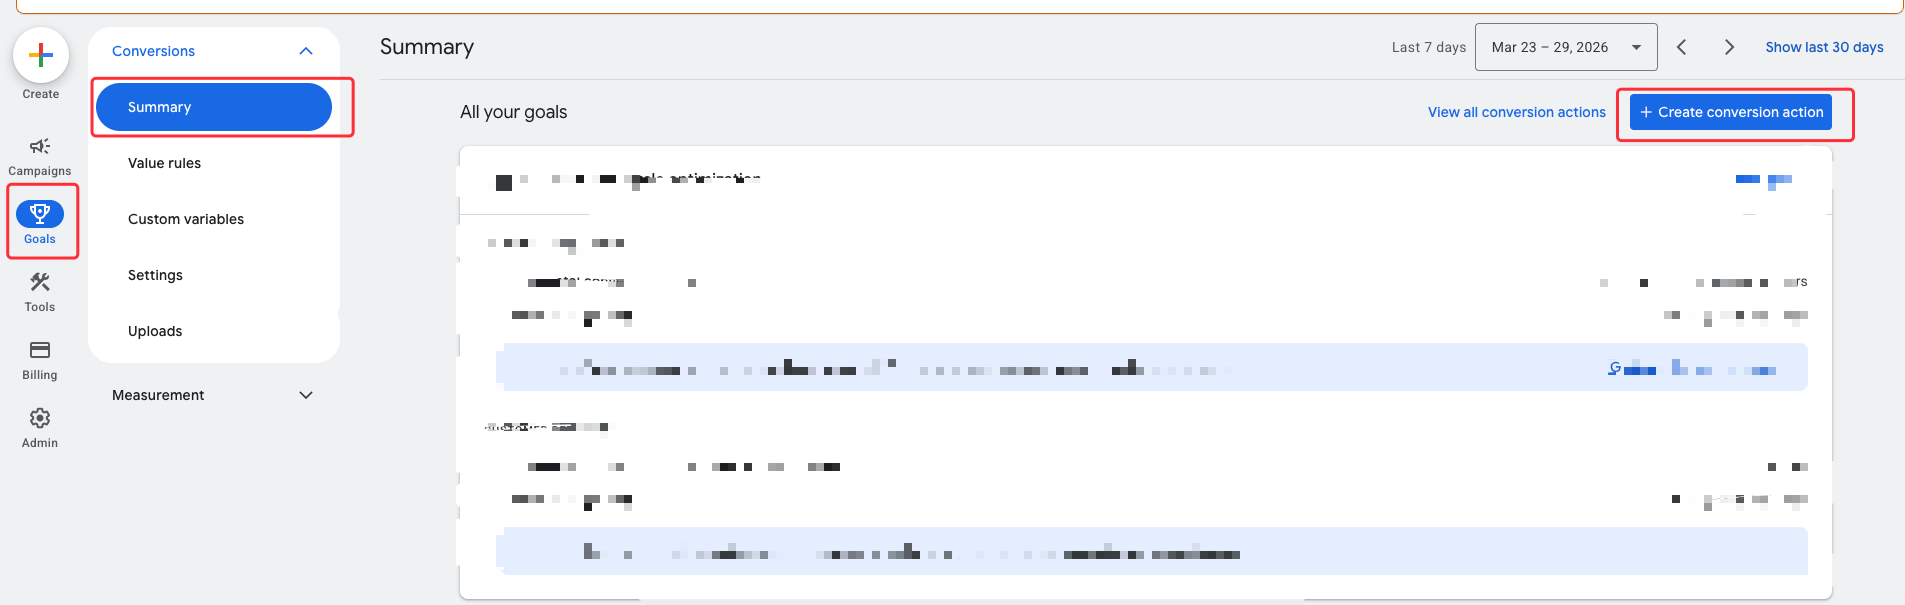
2. Choose the conversion category
When the wizard asks you to group or categorize conversions, select the category for the action you’re creating (e.g. Purchase first, then the others).

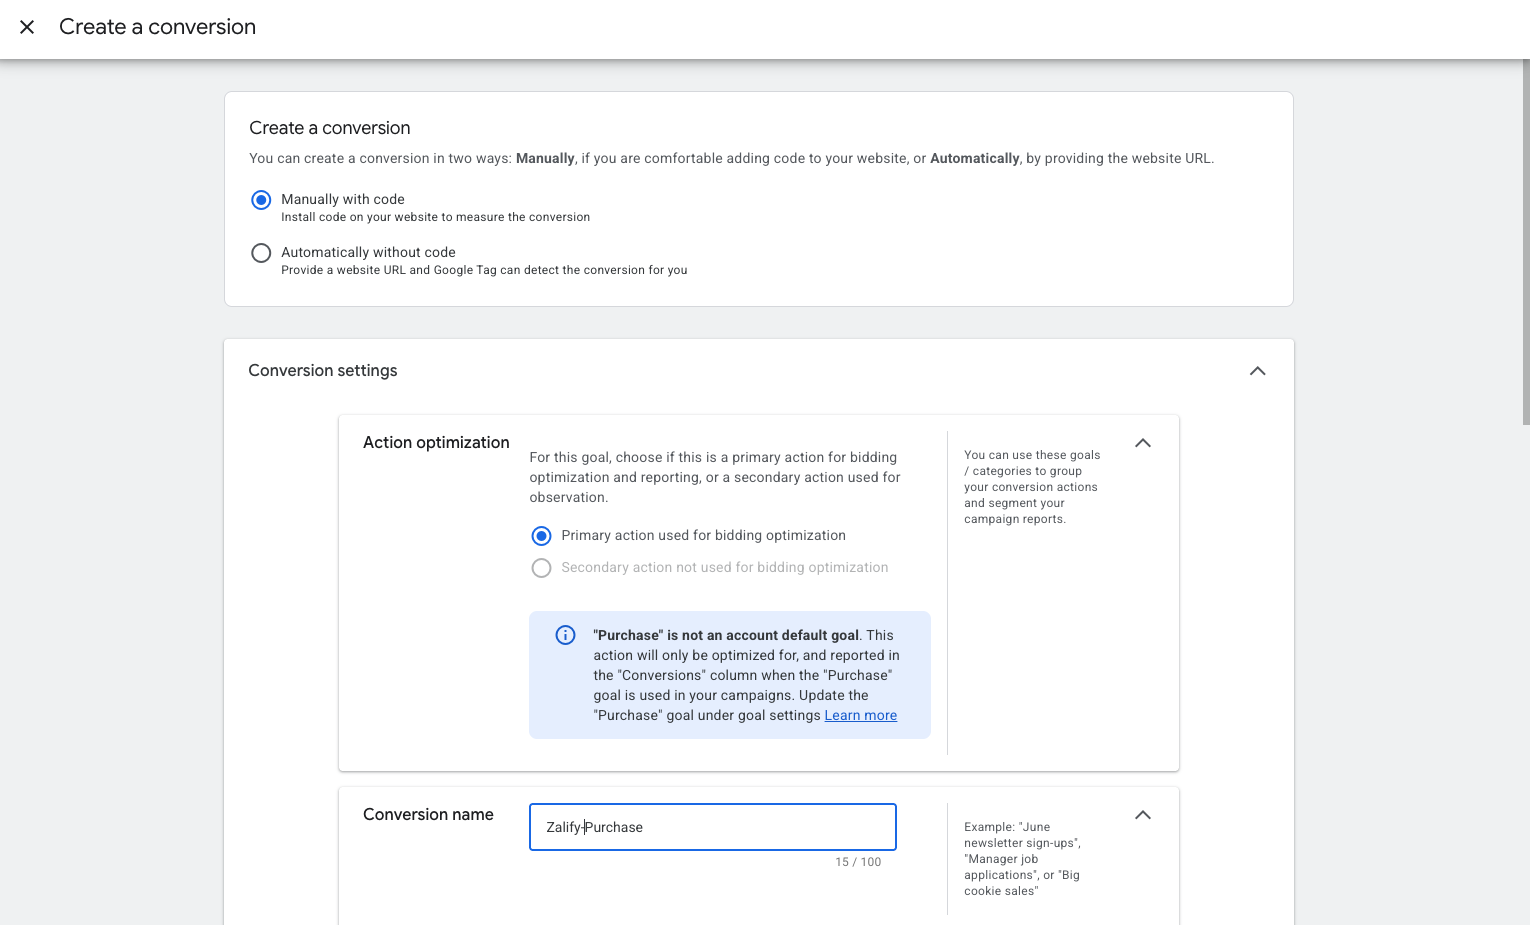
3. Create manually with code
On Create a conversion:
- Select Manually with code so the event snippet exposes
send_to(avoid “Automatically without code”—Zalify expects the standardsend_toformat). - Enter a Conversion name (e.g.
Zalify Purchase,Zalify Page view). - Action optimization: use Primary action used for bidding optimization for Purchase; use Secondary for Page view, Add to cart, and Begin checkout so they don’t compete with purchase as the main goal.
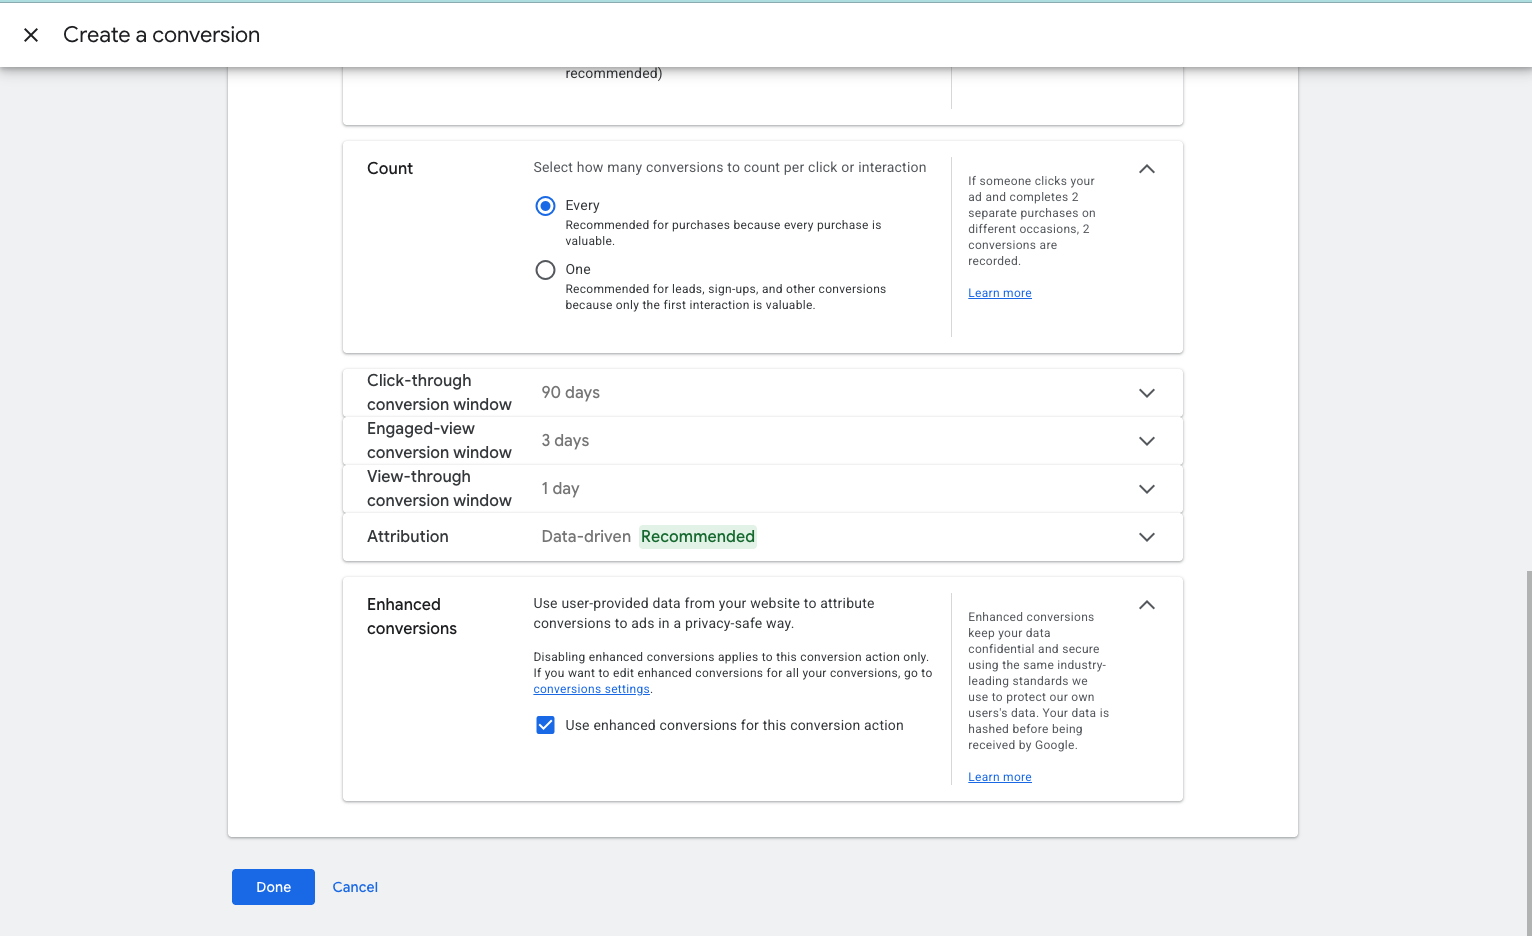
4. Count, windows, and enhanced conversions
- Purchase: Count = Every (each purchase counts).
- Page view, Add to cart, Begin checkout: Count = One (first interaction only—typical for upper-funnel events).
Adjust click/view windows and attribution if your account strategy requires it.
For Purchase only, turn on Use enhanced conversions for this conversion action so Google can use hashed user data Zalify sends. The other three actions do not rely on enhanced conversions.
Click Done.
5. Open the event snippet from Summary
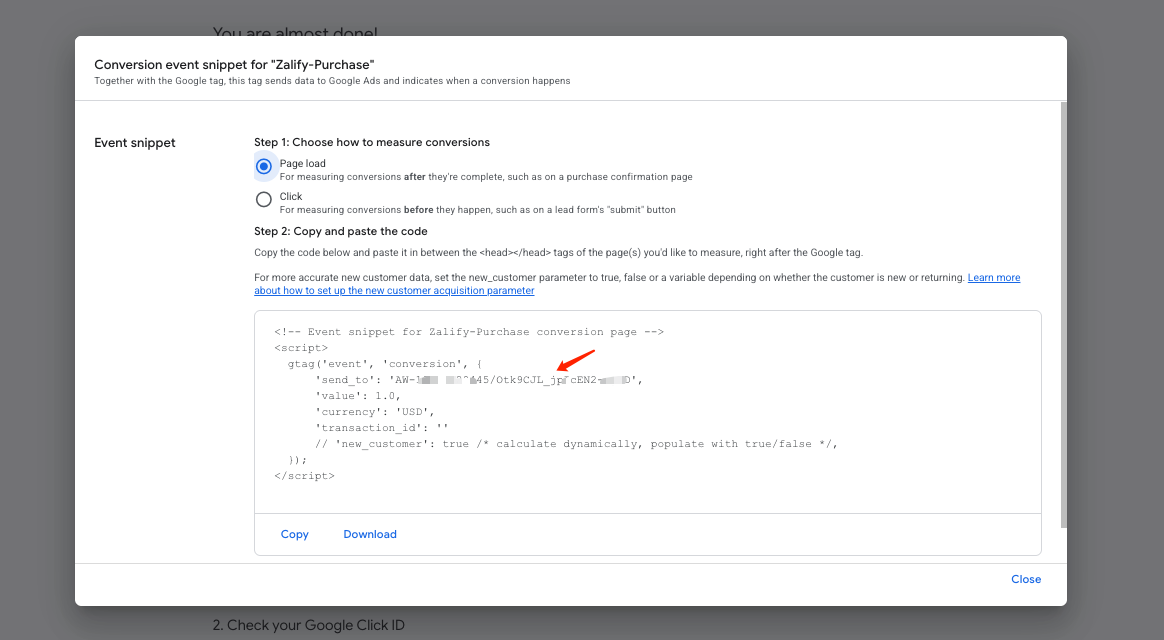
On the Summary step, under Set up with a Google tag, find the new action and click See event snippet.
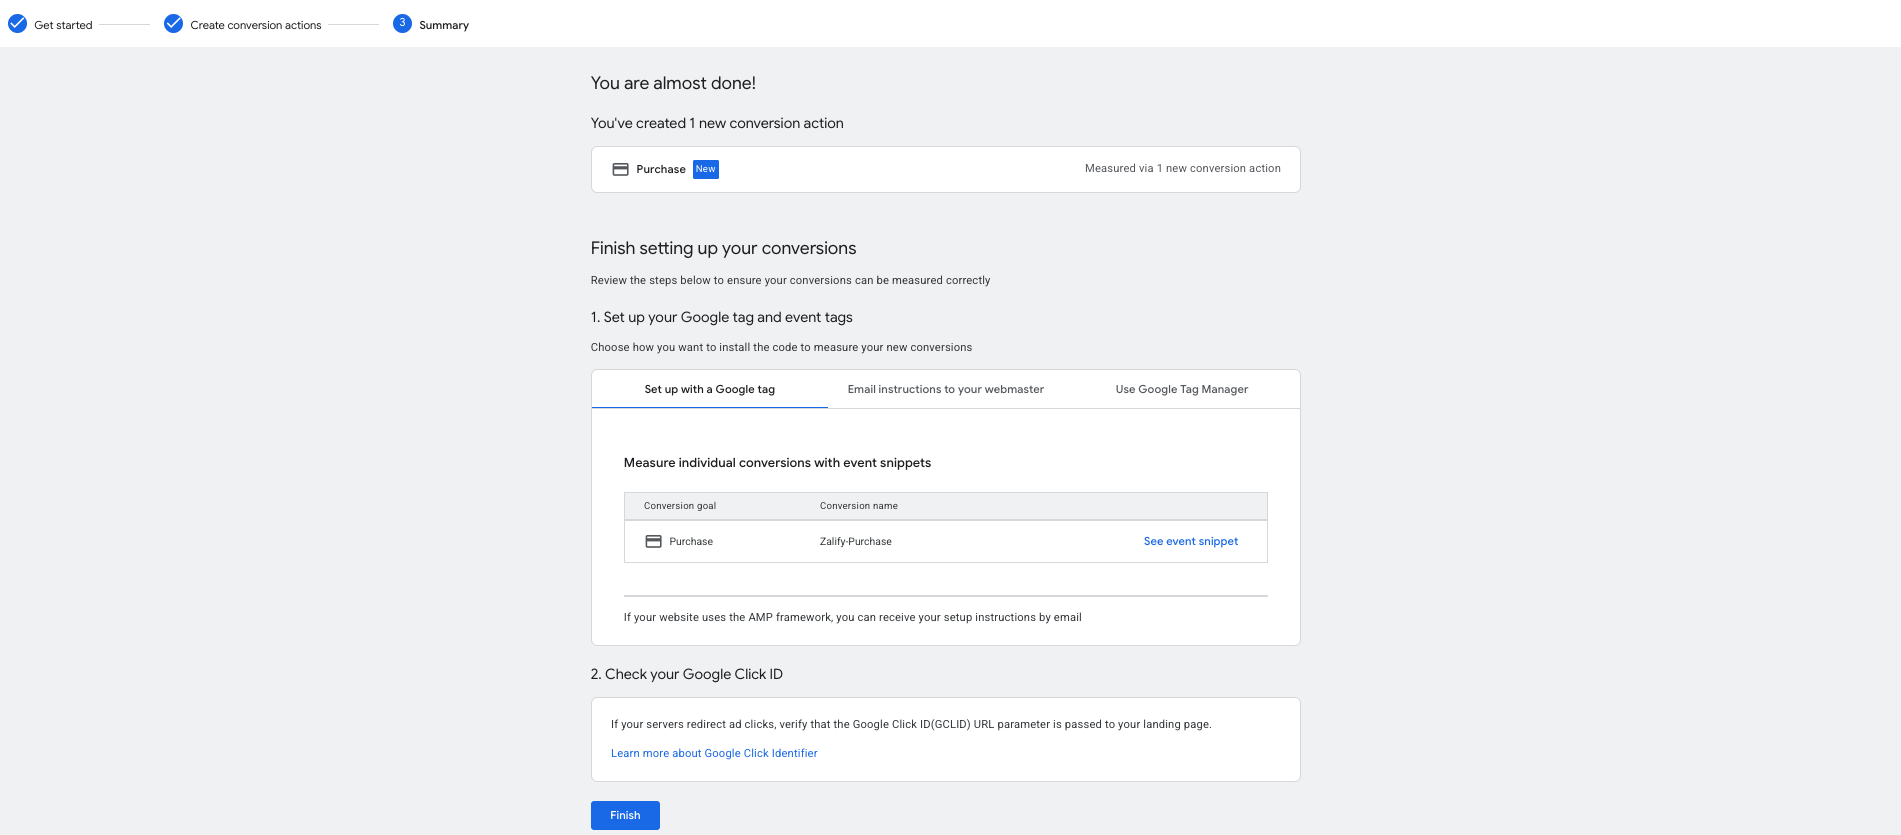
6. Map send_to to Zalify fields
The snippet includes gtag('event', 'conversion', { 'send_to': 'AW-XXXXXXXXX/LabelPart...' }). The send_to value is always AW-{id}/{label}. In Zalify, paste only the pieces below—do not put the full send_to string into one field:
| In the code | What to enter in Zalify |
|---|---|
Full value AW-xxx/yyy | — |
| Conversion ID | Only xxx (the part after AW-—omit the AW- prefix) |
| Conversion Label | Only yyy (the part after /—omit AW-xxx/) |
The xxx part is usually the same for all four actions; yyy is different per action.
Choose Page load (consistent with how Zalify fires conversions on the page).
Enter values in Zalify
- Open Zalify Dashboard → Pixels → Google Ads, then add or edit your Google Ads pixel.
- First, enter Conversion ID: paste only the segment after
AW-(e.g. fromAW-123456789/…use123456789). It’s usually shared across all four actions. Do not include theAW-prefix in this field. - Then fill each Conversion Label: for each action, paste only the segment after
/(e.g. fromAW-123/AbCd_efuseAbCd_ef) into View content, Add to cart, Begin checkout, and Purchase. Do not pasteAW-xxx/—use each action’s own label and don’t mix or leave fields blank. - Turn Enabled on and click Save.
![]()
You do not need to install the event snippet in your theme—Zalify handles timing and delivery.
Enhanced conversions and troubleshooting
- If Purchase was created with enhanced conversions enabled, you often don’t need a separate legacy setup. For older actions, enable enhanced conversions in that action’s settings and align with Google tag / on-site user data per Google Help.
- Enhanced conversions mainly apply to Purchase (order context); other events generally don’t send the same matchable data.
- Reporting in Google Ads can lag from a few hours up to about 72 hours—that’s expected.