Pixels
/
3 min read
Set Up Meta (Facebook) Pixel & Conversions API (CAPI)
Install and configure the Meta Pixel and Conversions API (CAPI) on your Shopify store using Zalify for accurate conversion tracking.
Why Use Meta Pixel?
The Meta Pixel tracks visitor actions on your store and sends that data to Meta (Facebook & Instagram) for:
- Conversion tracking — See which ads drive sales
- Audience building — Create retargeting and lookalike audiences
- Ad optimization — Let Meta's algorithm find your best customers
Prerequisites
Before setting up the Meta Pixel with Zalify, make sure you have:
- A Meta Business Manager account
- A Meta Pixel ID (found in Events Manager)
- Zalify installed on your Shopify store
Setup Steps
Find your Meta Pixel ID
- Go to Meta Events Manager
- In the left sidebar, open Overview, then find your Pixel or dataset in the Datasets table
- Under the dataset name, copy the value labeled ID — that is your Pixel ID (usually 15–16 digits)
![]()
Add the Pixel in Zalify
- Open your Zalify Dashboard
- Navigate to Pixels → Meta Pixel
- Click Add Pixel
- Paste your Pixel ID into the Meta Pixel ID field
- Turn on the Enabled toggle
- Click Save
Configure events
Zalify automatically tracks the following standard events:
| Event | When it fires |
|---|---|
PageView | Every page load |
ViewContent | Product page viewed |
AddToCart | Item added to cart |
InitiateCheckout | Checkout started |
Purchase | Order completed |
No additional configuration is needed for standard events.
Verify the pixel
Use the Meta Pixel Helper Chrome extension to verify events are firing correctly on your store.
Advanced: Conversions API
For improved tracking accuracy (especially with iOS 14+ privacy changes), Zalify supports the Meta Conversions API (CAPI) alongside the browser pixel.
Recommended
Enabling both browser Pixel and Conversions API gives you the most accurate conversion data. Zalify handles deduplication automatically.
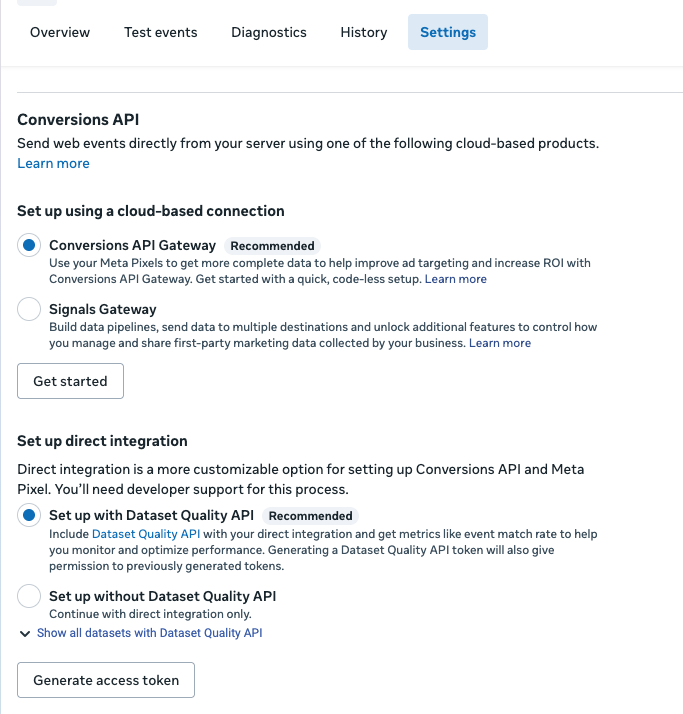
Generate an access token in Meta:
- In Events Manager, open the dataset for your Pixel
- Open the Settings tab and find the Conversions API section
- Under Set up direct integration, keep the recommended option selected, then click Generate access token and copy the token
Enable CAPI in Zalify:
- Go to Zalify Dashboard → Pixels → Meta Pixel
- Click Add Pixel (or edit your existing Meta pixel)
- Paste the token from the step above into the Meta Conversion API: Access Token field
- Click Save
Paid plan required
Server-side tracking through the Conversions API requires a paid Zalify plan.
Troubleshooting
- Pixel not firing? Check the troubleshooting guide
- Duplicate events? Make sure you don't have another app or theme code also firing Meta Pixel events
- Low match quality? Enable Conversions API for server-side event matching